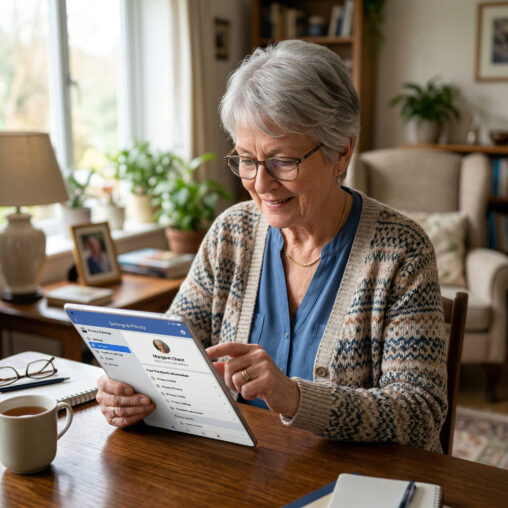
How do I set privacy settings on Facebook is a step-by-step guide. Knowing how to set your privacy settings on this platform is my way of helping readers like you. Everyone will want to customize these settings to their own preference, lets learn now about Facebook privacy settings.
Affiliate Disclosure
Amazon + Friends
Affiliate Disclosure: Some of the links on this website may be affiliate links. This means that if you click a link and make a purchase, I may earn a small commission at no extra cost to you. These commissions help support 65 Plus Life and Boomer Biz HQ, and Dawg Solutions. so I can continue creating free resources for older adults.
Amazon Disclosure: As an Amazon Associate, I earn from qualifying purchases. Any Amazon links used throughout this website may earn a commission when you purchase through them.
Wealthy Affiliate Disclosure: I am also a proud affiliate of Wealthy Affiliate. If you choose to join their platform through my referral link, I may earn a commission. I only recommend Wealthy Affiliate because it has personally helped me build websites and create income online, and I believe it can help other older adults learn these skills too.

Thank you for supporting my work — it truly means a lot.
Jeff
How Do I Set Privacy Settings On Facebook
Step-by-Step: How to Set Privacy Settings on Facebook
1. Open Facebook Settings
- Go to Facebook
- Click your profile picture (top right)
- Select “Settings & Privacy”
- Click “Settings”
Step 2: Go to Privacy Checkup Easiest Way
This is the quickest way to lock things down.
- In Settings, click “Privacy Checkup”
- Follow the guided steps:
-
- Who can see what you share
- How people can find you
- Your data settings
What Are Facebook Safety Tips For Seniors
This is great if you want a quick, safe setup without digging into everything manually
Step 3: Adjust Key Privacy Settings Manually
A. Who Can See Your Posts
- Click “Privacy” (left menu)
- Find “Your Activity”
- Change:
-
- Who can see your future posts → set to Friends (recommended)
- Limit past posts → click this to make old posts private
B. Who Can Find You
- Still under Privacy
- Scroll to “How People Find and Contact You”
- Set:
-
- Friend requests → Friends of friends
- Phone/email lookup → Only me or Friends
- Search engines linking → Turn OFF
C. Profile & Timeline Settings
- Click “Profile and Tagging”
- Adjust:
-
- Who can post on your timeline → Only me
- Review posts you’re tagged in → Turn ON
- Review tags → Turn ON
D. Stories Settings
- Go to “Stories”
- Set who can see your stories (Friends or Custom)
How To Join Facebook Groups For Retirees Made Easy
E. Location & Face Recognition Optional but Important
- Go to “Location” → turn OFF location history
- Go to “Face Recognition” → turn OFF
Step 4: Lock Down Your Profile Optional but Strong
- Go to your profile page
- Click the three dots (…)
- Select “Lock Profile” (if available)
This limits what strangers can see big time
Recommended “Safe” Setup Simple Version
If you just want a quick checklist:
- Posts → Friends
- Friend requests → Friends of friends
- Timeline posting → Only me
- Tag review → ON
- Search engine linking → OFF
Jeff Shares
After you’re done, go to:
- View As on your profile
This lets you see what a stranger sees—super helpful for double-checking.
Setting Up Privacy for a Facebook Business/Blog Page
First—important mindset:
Your Page = Public (for visibility)
Your Personal account = Private (for safety)
Step 1: Open Your Page Settings
- Go to Facebook
- Click your profile picture
- Select “See all profiles” → choose your Page
- Click “Settings” (or “Professional dashboard”)
Step 2: Control Who Can Interact With Your Page
A. Page Visibility
- Go to Settings → General
- Make sure:
-
- Page is Published (so people can find you)
How To Use Pinterest For Retirement Planning
You want this ON for your blog/business
B. Visitor Posts (Important)
- Go to Settings → Privacy → Page and tagging
- Adjust:
-
- Who can post on your Page?
Set to Only admins (recommended) - Or allow posts but turn on review first
- Who can post on your Page?
C. Comment Control (Spam Protection)
- Go to Settings → Followers and public content
- Turn on:
-
- Profanity filter
- Block specific words (great for spam links)
Step 3: Messaging Privacy & Control
- Go to Settings → Messaging
- Adjust:
-
- Allow messages (usually YES for business)
- Turn on:
-
- Automated responses
- Away messages
This keeps things professional without you being glued to your phone
Step 4: Control Who Can Manage Your Page (VERY IMPORTANT)
- Go to Settings → Page access
- Review:
-
- Who has Admin access
- Remove anyone you don’t fully trust
For you right now: likely just YOU
Step 5: Protect Your Personal Account (Critical)
Your Page is only as secure as your personal profile.
Do this:
- Go to Settings → Security and login
- Turn ON:
-
- Two-factor authentication
- Review:
-
- Where you’re logged in
- Remove unknown devices
Step 6: Control What’s Visible About You
Your Page shows Page info, not your personal info—but:
- Go to your Page → Edit details
- Only include:
-
- Business email jeff@boomerbizhq.com
- Business website like Boomer Biz HQ
- Optional phone number (or skip it)
Step 7: Limit Tagging & Mentions
- Go to Settings → Page and tagging
- Set:
-
- Review tags → ON
- Review posts mentioning your Page → ON
Smart Setup for Your Blogs
5 Artificial Intelligence Retirement Planning Tools
Here’s the ideal setup:
✔ Page is fully public (for traffic)
✔ Only YOU can post
✔ Comments allowed but filtered
✔ Messaging ON (for engagement)
✔ No personal info connected
Bonus Tip: Check What People See
- Visit your Page
- Click … (three dots) → View as visitor
This shows exactly what strangers see
Common Mistake to Avoid
Don’t try to make your Page “private” like a profile—
That defeats the whole purpose of growing your blog/business.
Instead, think:
“Public content, controlled interaction”
How to Get Traffic to Your Facebook Blog/Business Page
Step 1: Optimize Your Page
Before driving traffic, make sure your page converts visitors:
- Go to Facebook → your Page
- Set up:
-
- Profile picture → your logo or brand image
- Cover photo → what your page helps people with
- Bio/About → clear benefit (not just description)
Example:
- ❌ “Welcome to my blog”
- ✅ “The Zero-Cost Freelance Writer Starter Plan”
- Add your website link (VERY important)
Step 2: Post Content That Actually Pulls People In
Most people get this wrong—they just drop links. Don’t do that.
Instead, use this formula:
Hook → Value → Soft Call-to-Action
Example post:
“Most retirees don’t realize this about Social Security…
You could be leaving money on the table.
Here’s what you need to know
(quick tip)
Full guide here: [your link]”
Step 3: What to Post (High-Traffic Content Ideas)
For your niche, these work really well:
For Boomer Biz HQ
- “Mistakes retirees make with Social Security”
- “5 ways to earn extra income after 60”
- “Things no one tells you about retirement”
These are search-based topics people already care about
Step 4: Simple Posting Schedule
Keep it realistic:
- 1 post per day OR
- 3–5 posts per week
Mix:
- Tips
- Questions
- Short stories
- Blog links (not every post)
Step 5: Use Facebook Groups (This is HUGE)
This is your secret weapon.
What to do:
- Search on Facebook:
-
- “Retirement tips”
- “Senior living”
- “Freelance Writing Tips”
- Join groups with active members
- Post like this:
- Answer questions
- Share helpful tips
- THEN occasionally drop your link
Example:
“I actually wrote a full guide on this if you want more details…”
Step 6: Engage (This Boosts Reach Big Time)
Facebook rewards interaction.
Every time you post:
- Reply to comments
- Ask a question at the end
- Like responses
More engagement = more people see your post
Step 7: Use Simple Visuals (No Fancy Stuff Needed)
Posts with visuals get WAY more reach.
Try:
- Short videos (even 30–60 seconds)
- Images with text (Canva works great)
- Before/after or tip graphics
Step 8: Boost What’s Already Working
If a post gets:
- Likes
- Comments
- Shares
That’s a winner—do more like it
(Optional later: boost it with $5–$10 ads)
Simple Traffic Plan (If You Want It Easy)
Here’s a plug-and-play routine:
Daily (15–20 minutes):
- Make 1 helpful post
- Comment in 2–3 groups
- Reply to comments
That’s it. Consistency beats everything.
Key Mindset Shift
Don’t think:
“How do I promote my blog?”
Think:
How do I help people first, then lead them to my blog?”
Facebook → Blog → Email Funnel (Simple & Powerful)
The Big Picture
The Zero Cost Freelance Writer Starter Plan
Think of it like a path:
Facebook Post → Blog Article → Email Signup → Follow-Up Emails → Income
You’re not just getting clicks—you’re building a list you own.
Step 1: Facebook Post
Go to Facebook and create posts that:
- Grab attention
- Give quick value
- Lead to your blog
Winning Formula:
Hook → Tease → Link
Example (Boomer Biz HQ):
“Most retirees miss this Social Security trick…
It could cost you thousands over time.
Here’s what to know
Read more: [your blog link]”
Don’t over-explain—make them click
Step 2: Blog Article
Your blog is where the magic starts.
Inside your article:
- Deliver real value
- Build trust
- Add your email signup offer
Your Lead Magnet
You already have one:
“Jeffs 12-Month Retirement Income Content Plan”
Place it:
- At the top of the article
- Middle
- End
Example:
“Want a simple step-by-step retirement income content plan?
Download my free content plan here ”
Step 3: Email Capture
Use your email tool (like MailerLite):
- Create a signup form
- Connect it to your free guide
- Set it to automatically send the download
This is your list-building engine
Step 4: Email Follow-Up Sequence
Once they sign up, they should get emails automatically.
Simple 5-Email Sequence:
Email 1: Deliver the Freebie
- Give the guide
- Set expectations
“I’ll also send you helpful retirement tips”
Email 2: Build Trust
- Share your story
- Why you created Boomer Biz HQ
Email 3: Value
- Give 1–2 strong tips
- No selling yet
Email 4: Soft Offer
- Recommend a product/service
- (affiliate links go here)
Email 5: Problem + Solution
- Highlight a common issue
- Offer a solution (your blog/product)
Step 5: Monetization
Inside emails or blog posts:
- Affiliate products
- Helpful tools
- Recommended services
Keep it helpful, not pushy
How It All Connects
- Facebook post about Social Security
- → Links to your blog article
- → Article offers your free 12- month retirement income content plan
- → Visitor signs up
- → Gets your email sequence
- → Clicks a product → you earn
Your Weekly Workflow
3–5 times per week:
- Post on Facebook
- Link to your blog
1–2 times per week:
- Write a blog post
Once (setup):
- Create email sequence
Key Strategy Secret
You’re not chasing:
❌ Likes
❌ Followers
You’re building:
✅ Email subscribers
✅ Trust
✅ Repeat traffic
Whats Next
Based on what you’ve already got, we can do this next:
- Write your first funnel blog post
- Create your exact signup section
- Build your MailerLite emails (copy included)
Thank you for visiting ” Boomer Biz HQ”,
Jeff
Amazon Disclosure: As an Amazon Associate, I earn from qualifying purchases. Any Amazon links used throughout this website may earn a commission when you purchase through them.
Productive Writers
- How Do I Set Privacy Settings On FacebookHow do I set privacy settings on Facebook is a step-by-step guide. Knowing how to set your privacy settings on this platform is my way of helping readers like you. Everyone will want to customize these settings to their own preference, lets learn now about Facebook privacy settings. Affiliate Disclosure Amazon + Friends Affiliate Disclosure: … Continue reading “How Do I Set Privacy Settings On Facebook”
- How To Use Pinterest For Retirement PlanningHow to use Pinterest for retirement planning. Pinterest is a very good platform that I have had good results using for Boomer Biz HQ. I am going to share my strategy with you in this step-by-step guide, so you also can use Pinterest for retirement planning. Affiliate Disclosure Amazon + Friends Affiliate Disclosure: Some of … Continue reading “How To Use Pinterest For Retirement Planning”
- 5 Artificial Intelligence Retirement Planning Tools5 Artificial intelligence retirement planning tools are important for us to know, you will learn about these high-tech ai tools and how to use them. With time and patience you can be a pro planning for your retirement with much less stress. Affiliate Disclosure Amazon + Friends Affiliate Disclosure: Some of the links on this … Continue reading “5 Artificial Intelligence Retirement Planning Tools”
- How To Choose Affordable Email Marketing ToolsHow to choose affordable email marketing tools is your key to retirement income success. I am going to take you through each step one by one, so anyone interested can learn about these email marketing tools and how to use them the most effectively. Affiliate Disclosure Amazon + Friends Affiliate Disclosure: Some of the links … Continue reading “How To Choose Affordable Email Marketing Tools”
- How To Start Freelancing After Retirement With SuccessHow to start freelancing after retirement with success is one method of supplementing your retirement income. Social Security alone is not paying the bills for most retirees today, so I am going to share how I started freelancing to supplement my own retirement income. Affiliate Disclosure Amazon + Friends Affiliate Disclosure: Some of the links … Continue reading “How To Start Freelancing After Retirement With Success”
- Writer AccessWriter Access might be brand new to you, you are at the right place if you are interested in freelance writing. Many seniors are entering the freelance writing field with success, even with zero experience you also can supplement your income online. Affiliate Disclosure Amazon + Friends Affiliate Disclosure: Some of the links on this … Continue reading “Writer Access”
- Can I Use My Medicare Benefits For Telehealth ServicesCan I use my medicare benefits for telehealth services. With telehealth services becoming more popular, knowing if your medicare benefits will cover these services can be important. That is what we will be discussing in detail in this article. Affiliate Disclosure Amazon + Friends Affiliate Disclosure: Some of the links on this website may be … Continue reading “Can I Use My Medicare Benefits For Telehealth Services”
- The Zero Cost Freelance Writer Starter PlanThe zero cost freelance writer starter plan is my pleasure to share with you. This is a good way to test the freelancing writing opportunity, many of you will love to know this is budget-friendly. If freelance writing interests you, here is my free starter plan. Affiliate Disclosure Amazon + Friends Affiliate Disclosure: Some of … Continue reading “The Zero Cost Freelance Writer Starter Plan”
- What Are Common Social Security MistakesWhat are common social security mistakes to avoid, learn from my own mistakes so you also don’t make the same mistakes that I did. Your retirement income depends on knowing this information, and I am more than happy to take the time to share with you. Affiliate Disclosure Amazon + Friends Affiliate Disclosure: Some of … Continue reading “What Are Common Social Security Mistakes”
- 12 Month Retirement Income Content Plan12 month retirement income content plan is compliments of Boomer Biz HQ. Freelance writing is one of the most budget-friendly startups for people over 50. You alreay contain the knowledge you need from your lifes experiences, now all you need is a content plan. Affiliate Disclosure Amazon + Friends Affiliate Disclosure: Some of the links … Continue reading “12 Month Retirement Income Content Plan”